Shopify 主题 Section 开发完整指南
Section(分区) 是 Shopify 主题最重要的复用单元——商家在 Theme Editor 里看到的每一块(hero、特色商品、推荐评价、FAQ 等)背后都对应一个 sections/*.liquid 文件。掌握 Section 开发是从”会改主题”到”会做主题”的核心台阶。
本文用一个完整可复制的”系列商品展示” Section 示例,带你走通从文件创建到 Theme Editor 接入的全流程。完成后你将会:
- 理解
{% schema %}与 settings 的关系 - 知道
presets何时填、何时不填 - 能给运营留出合理的可视化配置项
Section vs Block vs Snippet:先理解差异
| 概念 | 文件位置 | 何时用 |
|---|---|---|
| Section | sections/*.liquid | 一整块独立功能区,可在 Theme Editor 中整体添加 / 移动 / 删除 |
| Block | 写在 Section 的 schema 里 | Section 内部可重复添加的小单元(如 FAQ 里的每个问答项) |
| Snippet | snippets/*.liquid | 纯代码复用,不出现在 Theme Editor,靠 Liquid {% render %} 调用 |
判断顺序:需要运营配置 → Section;Section 内重复元素 → Block;纯代码工具函数 → Snippet。
配套阅读:
- 主题架构全貌:Shopify 主题开发指南
- 本地开发环境:Shopify 主题本地开发
- Liquid 进阶:Liquid 进阶技巧
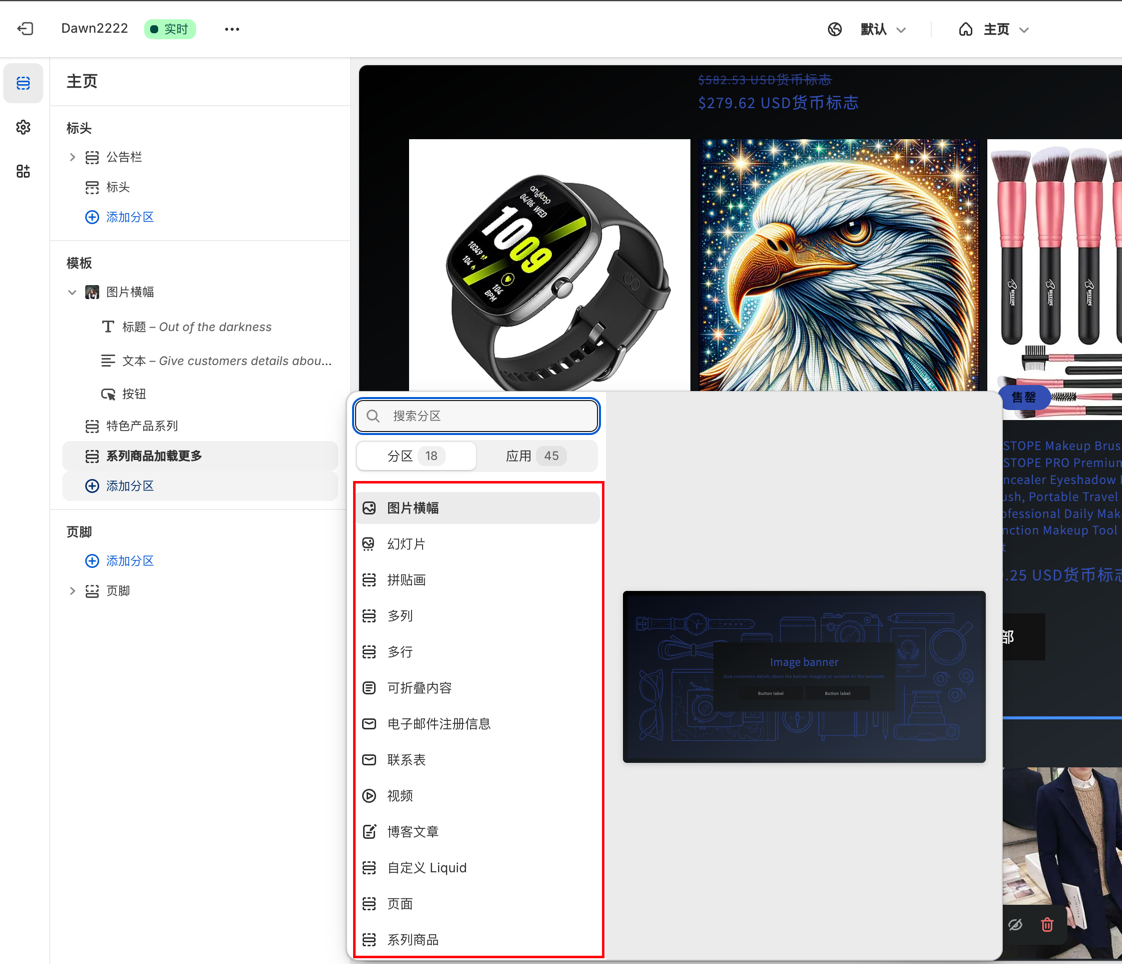
第一步:创建自定义 Section 文件
在你的 Shopify 主题目录下的 sections 文件夹中新建一个文件,例如 section-name.liquid。
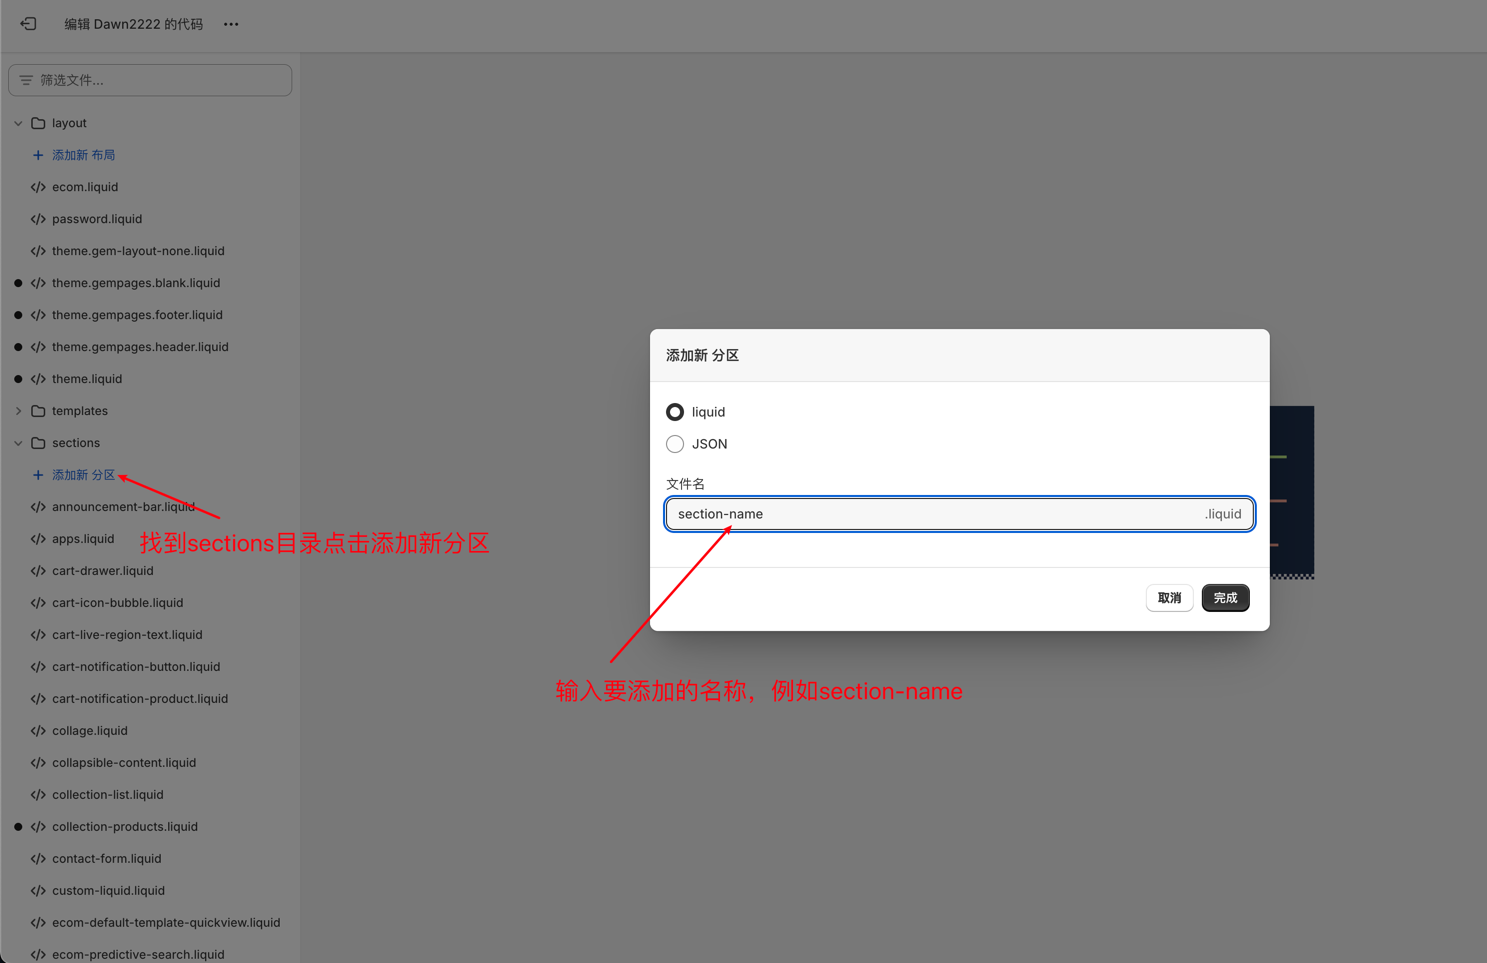
随后你看到该文件的默认代码, Section name, 是这个模块的名字, 你可以改成其他。
section-name.liquid
{% schema %}
{
    "name": "Section name",
    "settings": []
}
{% endschema %}
添加 liquid 代码
例如: 咱们添加一个展示商品的 Collection section,区块名称叫做系列商品展示
section-name.liquid
{% schema %}
{
    "name": "Collection Products",
    "tag": "section",
    "settings": [
        {
            "type": "collection",
            "id": "collection",
            "label": "选择系列"
        },
        {
            "type": "number",
            "id": "products_to_show",
            "label": "显示商品数量",
            "default": 4,
        }
    ],
    "presets": [
        {
            "name": "系列商品展示",
            "category": "产品"
        }
    ]
}
{% endschema %}

{% if section.settings.collection != blank %}
{% assign collection = collections[section.settings.collection] %}
<div class="collection-products-section">
    <h2>{{ collection.title }}</h2>
    <div class="products-grid">
        {% for product in collection.products limit: section.settings.products_to_show %}
        <div class="product-card">
            <a href="{{ product.url }}">
                <img src="{{ product.featured_image | image_url: width: 400 }}" alt="{{ product.title }}">
                    <p>{{ product.title }}</p>
                    <p>{{ product.price | money }}</p>
            </a>
        </div>
        {% endfor %}
    </div>
</div>
{% else %}
<p>请在主题编辑器中选择一个系列。</p>
{% endif %}
添加样式(可选)
你可以在 assets 文件夹的 CSS 文件中添加自定义样式,比如 base.css 或 theme.css:
base.css
.collection-products-section {
    padding: 40px 0;
}
.products-grid {
    display: grid;
    grid-template-columns: repeat(auto-fill, minmax(180px, 1fr));
    gap: 20px;
}
.product-card {
    text-align: center;
}
.product-card img {
    max-width: 100%;
    height: auto;
}
在 Theme Editor 中添加该 Section
进入 Shopify 后台的主题编辑器(Customize Theme):
找到你想添加该模块的页面(如主页)。
点击 “
添加分区”(“Add section”)。找到你新建的 系列商品展示(
Collection Products)模块并添加。在右侧设置栏中选择你想展示的系列。
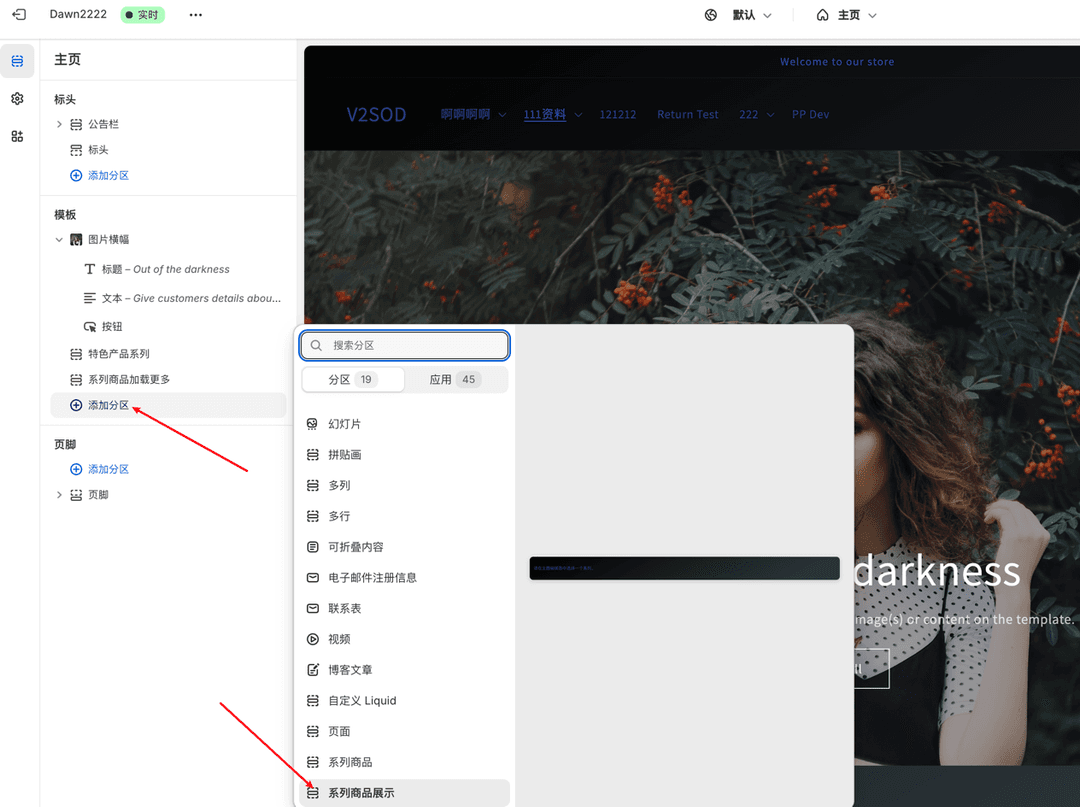
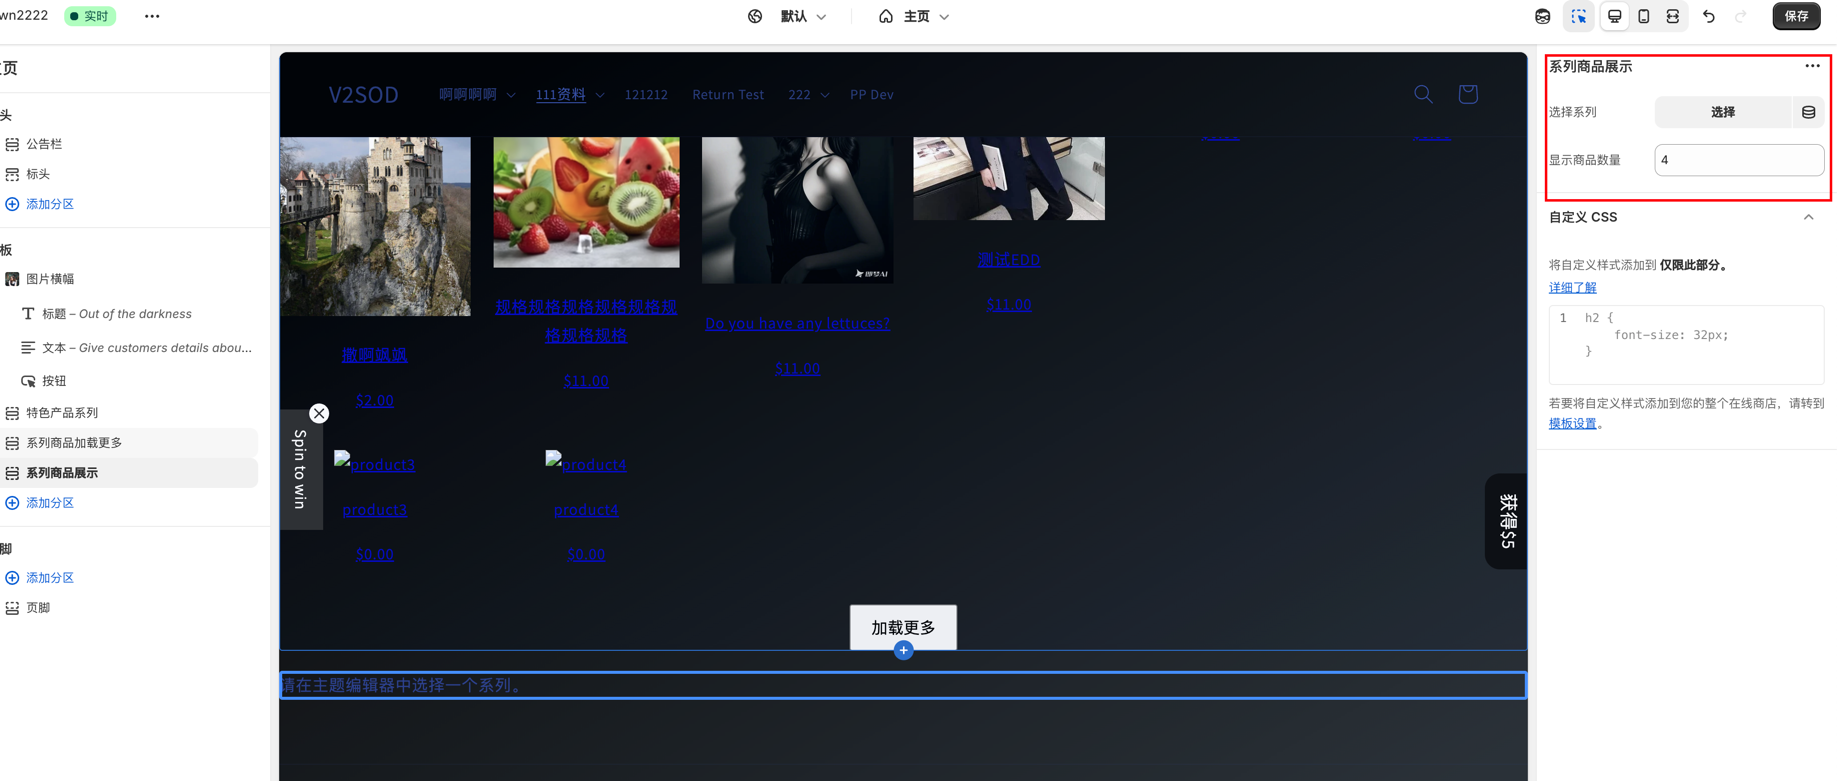
到这里我们已经完成了 Section 的添加,接下来你可以根据品牌风格修改或美化这个 Section。
常用 schema 字段类型速查
settings 数组里每一项的 type 决定运营能看到什么控件。常用类型:
| type | 控件形态 | 典型用途 |
|---|---|---|
| text / textarea | 单行 / 多行文本 | 标题、副标题、简介 |
| richtext | 富文本编辑器 | 含格式的描述 |
| image_picker | 图片选择器 | hero 图、icon |
| video / video_url | 视频选择器 | banner 视频 |
| url | URL 输入 | 按钮链接 |
| color | 颜色拾色器 | 背景色、文字色 |
| range | 滑块 | 圆角、间距、字号 |
| select / radio | 下拉 / 单选 | 布局选项 |
| checkbox | 开关 | 显示 / 隐藏某元素 |
| collection / product | Shopify 资源选择器 | 关联系列 / 商品 |
| number | 数字输入 | 显示数量 |
| header / paragraph | 分组标题 / 说明 | 设置面板排版用 |
完整字段类型见 Shopify 官方 Section schema 文档 。
进阶:用 Blocks 让 Section 支持重复元素
如果你的 Section 内有”用户想加几个就加几个”的元素(如 FAQ 项、特色卡片、Logo 列表),用 blocks 而不是固定 settings:
section-name.liquid
{% schema %}
{
  "name": "FAQ",
  "tag": "section",
  "settings": [
    { "type": "text", "id": "heading", "label": "标题", "default": "常见问题" }
  ],
  "blocks": [
    {
      "type": "question",
      "name": "问答项",
      "settings": [
        { "type": "text", "id": "q", "label": "问题" },
        { "type": "richtext", "id": "a", "label": "答案" }
      ]
    }
  ],
  "max_blocks": 20,
  "presets": [
    { "name": "FAQ", "category": "内容" }
  ]
}
{% endschema %}

<section class="faq">
  <h2>{{ section.settings.heading }}</h2>
  {% for block in section.blocks %}
    <details {{ block.shopify_attributes }}>
      <summary>{{ block.settings.q }}</summary>
      <div>{{ block.settings.a }}</div>
    </details>
  {% endfor %}
</section>
注意 {{ block.shopify_attributes }}——这是 Theme Editor 让运营点击 block 时能定位到对应 DOM 元素的关键。漏写就无法在编辑器里直观编辑。
常见问题(FAQ)
Q:为什么新建的 Section 在 Theme Editor 里看不到? A:90% 是因为 schema 里漏了 presets。只有声明了 presets 的 Section 才会出现在”添加分区”列表里。如果 Section 只用于特定模板(如 templates/product.json 里固定引用),可以不写 presets。
Q:Section 文件里能写多个 {% schema %} 吗? A:不能。一个 Section 文件只能有一个 schema 标签。需要”多个变体”时,用 select 类型的 setting 在 Liquid 里做条件渲染。
Q:tag 字段(如 "tag": "section")有什么作用? A:决定 Section 渲染时的外层标签元素(默认是 <div>,可以设为 section / article / aside 等)。建议显式设置为 section,对 SEO 与无障碍都更友好。
Q:Section 的 settings 默认值会被覆盖吗? A:会。default 只在第一次添加 Section 时生效,之后运营修改的值会持久化到 config/settings_data.json。改 default 不会影响已添加的实例。
Q:怎么限制一个 Section 只能在某些模板里使用? A:在 schema 里加 "enabled_on": { "templates": ["product"] } 或 "disabled_on": { ... }。OS 2.0 主题必备能力,常见于产品页专属 Section。
Q:Section 和 App Block 的关系是什么? A:App Block 是应用方注入的 block,主题开发者只需要在 Section 里加 { "type": "@app" } 即可允许 App 注入内容。这是 Online Store 2.0 主题的标志特性,是否支持 App Block 是商家选主题的硬指标。
Q:可以让 AI 帮我写 Section schema 吗? A:可以但需要 Shopify AI Toolkit 加持——直接让通用 AI 写 schema 经常会出现字段名错误或不存在的 type。AI Toolkit 让 AI 对照官方 Schema 文档生成,更稳。
延伸阅读
- Shopify 主题开发指南 — OS 2.0、Section / Block 系统全貌
- Shopify 主题本地开发 — CLI + Hot Reload 工作流
- Liquid 进阶技巧 — 数据处理、性能、组件化
- 水波浪动画 Section 示例 — 一个完整可复制的视觉 Section
- 背景音乐播放器 Section 示例 — 含多媒体 + 多 settings 的完整示例
- AI 辅助与主题工程化 — AI 写主题的协作流
小结:Section 是 Shopify 主题开发的最小有效抓手——只要会写一个完整的 Section,你就有了把任何设计稿”转成可运营配置的复用模块”的能力。先掌握 settings 字段类型 + presets 配置 + blocks 用法,复杂的主题项目就是这些基础块的组合。